Creating a Virtual Network of Linux Guests using VirtualBox
Introduction
The following instructions were last updated around September 2013. They still should work, but I have sinced moved to a more "automated" approach for creating a virtual network - see the automated approach here. I recommend using the automated approach (which essentially is a set of scripts to do the steps on this page), as opposed to the manual setup described below. However I leave these instructions here for reference.
When teaching data communications and network security I like to allow students to see and use real networks and software that demonstrate basic concepts. Although I teach a lab on networking in which students get some hands on experience, I also like students to be able to try things in their own time. Creating a small network (e.g. a client, router and server) is not feasible for most students as they usually only have a single computer (most often a laptop, sometimes a PC at home). Hence the two options available is to ask students to use network simulation software or to setup a virtual network inside their own computer. This article gives instructions for the latter.
Virtual machine software, like VirtualBox, VMWare and Parallels, allow one or more guest operating systems to run as an application on another host operating system. The host OS runs on real hardware (your computer), while the guest OS run on virtual hardware, which is hardware emulated by the virtual machine software. The guest OS plus emulated hardware can be simply referred to as a virtual machine (VM).
One part of hardware emulated by the virtual machine software is a network interface card. Virtual machine software also emulates network devices, like switches, cables and routers. So a virtual network can be built by creating multiple virtual machines and connecting them together via virtual cables and switches.
I will use VirtualBox, free virtual machine software that runs on Windows, Linux and Macintosh host operating systems, and supports most operating systems as guest. As most of my teaching uses Ubuntu Linux in demonstrations, and students need to gain experience with the Linux command-line for other courses, I will use a command-line only install of Ubuntu Linux as each of the guests. Specifically, I will use Ubuntu 12.04 LTS Server.
The virtual network topology (including number of nodes) needed will depend on the networking and security tasks to be demonstrated. Therefore my approach is to create a base virtual machine that can be easily copied (cloned) multiple times to create nodes in the virtual network. The following instructions focus on how to setup the base virtual machine, and then cloning the base virtual machine to create a node. To create further nodes, just repeat the relevant steps.
The procedure for setting up a virtual network is:
- Create a base virtual machine in VirtualBox. This base VM will eventually be cloned to create the actual VMs that for the virtual network.
- Install and configure Ubuntu in the base virtual machine. The configuration will be done so that once the base VM is cloned, it will be easy to use the cloned VM with minimal extra setup.
- Clone the base virtual machine to create the nodes. The virtual network will be made up of multiple virtual machines, or nodes. Each node will be a clone of the base virtual machine.
- Configure the nodes for the virtual network. Some minor configuration changes (such as host name, IP addresses) will be needed to setup each node in the virtual network.
- Use your virtual network.
Terminology
The host computer or operating system is the one in which you run VirtualBox (i.e. your real computer). VirtualBox can run virtual machines. I will also refer to a virtual machine as the guest system (and later nodes). We will create a base virtual machine, and then clone it multiple times to make nodes. The nodes will form a virtual network, all running inside VirtualBox on the host. The (virtualised) hardware that connects a virtual machine to a network is referred to as a (network) adapter, network interface card (NIC) or (network) interface.
Prior Knowledge
I assume you have a computer networking background (e.g. understand IP addresses, interfaces, routing) and some basic Linux/Unix command line experience. If this is your first time using the command line interface (CLI) then you still should be able to follow the instructions, however you may not fully understand what is happening. The Free Software Foundation offer a good, free book Introduction to the Command Line.
Add New Virtual Machine in VirtualBox
Install and start VirtualBox on your host computer.
Create a New Virtual Machine
I am currently using Ubuntu Server 12.04.3 LTS 32-bit, so I recommend using the same version. Download the .iso from Ubuntu or from a local mirror (e.g. Kasetsart Uni). The file name will be something like ubuntu-12.04.3-server-i386.iso and about 700 MB in size. (i386 indicates the 32-bit version; AMD64 refers to the 64-bit version; I used Ubuntu version 12.04.3).
In VirtualBox, create a new virtual machine, called base. Two parameters that you must choose for your VM are:
- Memory (RAM): 128 MB
- Hard disk size: 2 GB
Configure Network Adapter Settings
Before you start the virtual machine, edit the settings for the network adapters. By default, VirtualBox enables only the first adapter, but allows for four network adapters. We will configure all of them now (although may not use all four later).
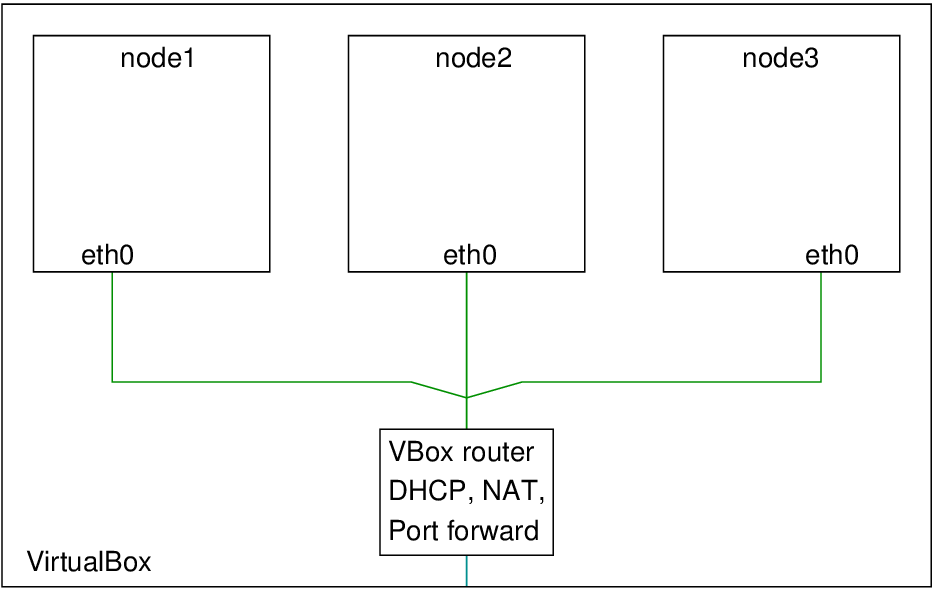
Adapter 1 is configured by default to use NAT. That allows the virtual machine to have Internet access, but not act as a server or contact other virtual machines. So for example if we had three virtual machines called node1, node2, and node3, the configuration using NAT only would look like the following:
For our virtual network we want our nodes to communicate with each other. However to simplify the management of the VMs, they should each also have Internet access (e.g. so software updates can be performed) and allow remote SSH connections (e.g. so you can connect to the guest via the host using SSH). The network configuration we are aiming for is in the following figure.
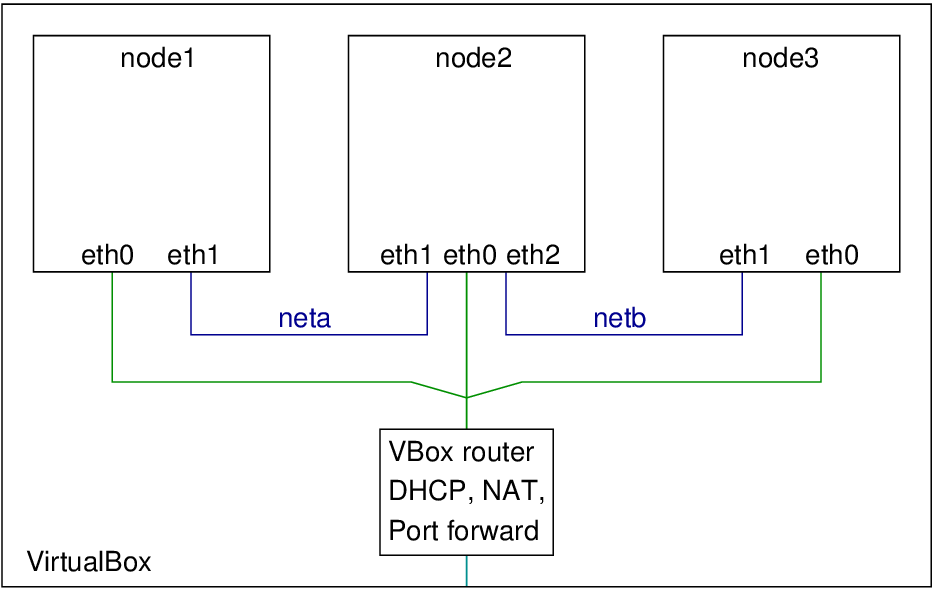
The first step is to give the base virtual machine extra network adapters. In VirtualBox, find the Network settings to see a list of four potential network adapters. Adapter 1 is already enabled and configured to use NAT. Expand the Advanced options. There are two things to change:
- Press the Port Forwarding button and add a new rule with the following parameters:
- Name: ssh
- Protocol: TCP
- Host IP: empty
- Host Port: 2201
- Guest IP: empty
- Guest Port: 22
- The Adapter Type may optionally be changed to Paravirtualized Network (virtio-net). This gives a small performance increase when using the network. (This step is optional - the default type should still work ok).
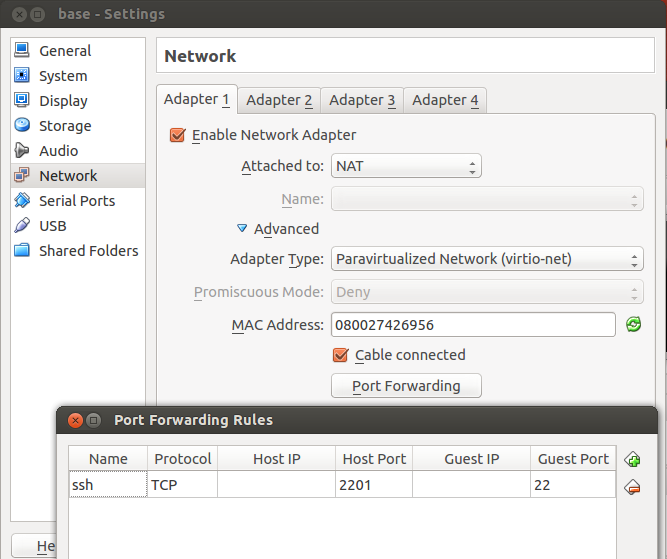
The port forwarding was setup so that we can access the virtual machine using SSH. You don't have to use port 2201 - any port number unused by the host should be ok.
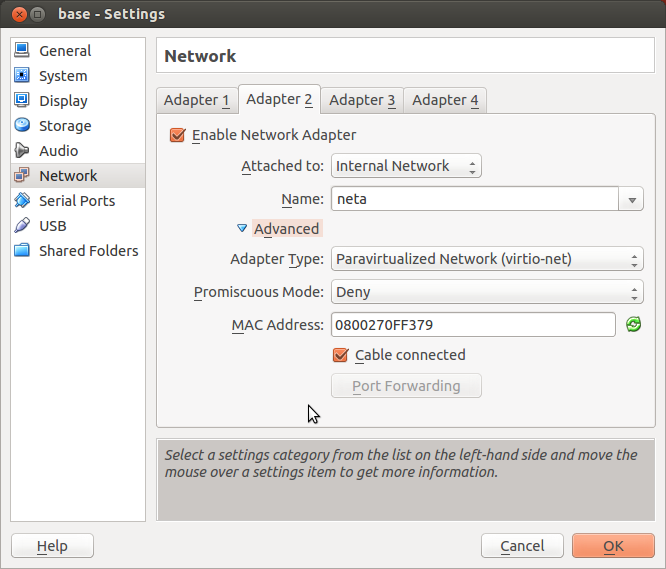
Now enable the other three adapaters (2, 3 and 4). For each adapter, use the following values:
- Attached to: Internal Network
- Name: neta (for Adapter 2), netb (Adapter 3), netc (Adapter 4)
- Adapter Type: Paravirtualized Network (virtio-net) [or optionally leave as the default value]
- Promiscuous Mode: Deny
- MAC Address: default value (it should be different across all adapters)
- Cable Connection: yes (checked) for Adapter 2; no (unchecked) for Adapters 3 and 4
- Port Forwarding: no rules
The figure below shows the settings for Adapter 2:
Configuring all four network adapters in the base virtual machine will make it easier in configuring nodes cloned from the base.
When you start the VM for the first time, VirtualBox prompts for a disc (iso) to boot from. Select the downloaded Ubuntu .iso image.
Install Ubuntu and Update Software
Install Ubuntu
The Ubuntu installation is rather straightforward. Most default options can be chosen or you can chose values that suit you (e.g. language, keyboard, time zone). There are however several important values to be chosen:
- On the first install menu (the black screen with the menu in the middle, which is displayed after you've chosen the language), press F4 and select Install a minimal virtual machine.
- Username and password: I chose network and network. The virtual machines are only intended to be used on your computer, so securing them with a strong password does not bring many benefits; choose a simple password and re-use it when necessary (e.g. MySQL, root user).
- How to manage upgrades? I chose No automatic upgrades as I'd like to keep the versions of software used in virtual networks the same for different users. However choosing automatic upgrades should also be acceptable.
- In the Software Selection menu, select: Basic Ubuntu server, OpenSSH server and LAMP server. (Note that if you forget to select software at this step, you can bring this menu up later once Ubuntu is installed by typed sudo tasksel on the command line.)
For those for which this is their first time install Ubuntu, I've taken a set of screenshots for my Ubuntu install which you can follow.
Start and Login to Base Virtual Machine
At the end of the Ubuntu install procedure you are presented the option to Continue to reboot into the virtual machine. Do so, and login using the username and password you created, e.g. network and network. You should see a prompt like:
network@base:~$
meaning you are logged in as the user network on the host base and currently in your home (~) directory.
Install and Update Software
Once Ubuntu is installed and running, you should update the existing software packages and install some additional packages.
Choose a Different Repository Mirror (Optional)
Before you download packages, you may want to change the default Ubuntu repository mirror to another one. For example, I will change my default mirror for Thailand (th.archive.ubuntu.com) to a mirror at Kasetsart University (mirror1.ku.ac.th). To do so, you need to edit the file /etc/apt/sources.list. The following will make the changes, as well as keep backups:
network@base:~$ sudo cp /etc/apt/sources.list /etc/apt/sources.list.original
network@base:~$ sed "s#th.archive.ubuntu.com#mirror1.ku.ac.th#g" /etc/apt/sources.list > sources.list
network@base:~$ sudo mv sources.list /etc/apt/
Use apt-get to update and install packages as follows:
network@base:~$ sudo apt-get update
network@base:~$ sudo apt-get upgrade
network@base:~$ sudo apt-get install iperf wget lynx man-db manpages manpages-dev iputils-tracepath traceroute tcpdump nano ethtool telnet iptables iputils-arping ettercap-text-only dnsutils iptraf whois subversion build-essential
Optionally, if you did not select LAMP server (or OpenSSH server) in the software selection menu during the install, then you can do so now by running tasksel.
network@base:~$ sudo tasksel
Add Root Password
By default, Ubuntu doesn't enable a login account for root user. Instead sudo should be used by the normal user. In some cases we may need root login and hence we will create a password. I will choose a password which is the same as the normal user (e.g. network):
network@base:~$ sudo su
root@base:/home/network# passwd
Enter new UNIX password: network
Retype new UNIX password: network
passwd: password updated successfully
root@base:/home/network# exit
exit
network@base:~$
Configure Networking on the Guest
The base system will have multiple network interfaces, however we may not use all of them:
- eth0 is used for normal Internet access. It is configured by the special DHCP server provided by VirtualBox. There is nothing to change with this interface; it should be set correctly already.
- eth1 is used for the internal network (to connect to other virtual machines). We will manually set the address for this interface.
- eth2 is used in the same way as eth1. However initially in VirtualBox we will set the cable to be disconnected. This interface will only be needed on some virtual machines (usually routers).
- eth3 is used in the same way as eth2.
Now configure addresses for the interfaces. The first interface, eth0, should be configured to use DHCP. VirtualBox includes a DHCP server that allocates IP addresses to guests. The other interfaces should be configured with static IP addresses. The configuration of the eth1 interface is performed in the file /etc/network/interfaces. Edit the file with nano by typing:
network@base:~$ sudo nano /etc/network/interfaces
auto eth1
iface eth1 inet static
        address 192.168.1.11
        netmask 255.255.255.0
        network 192.168.1.0
        broadcast 192.168.1.255
        post-up route add -net 192.168.0.0 netmask 255.255.0.0 gw 192.168.1.1 dev eth1
        pre-down route del -net 192.168.0.0 netmask 255.255.0.0 gw 192.168.1.1 dev eth1

#auto eth2
#iface eth2 inet static
#       address 192.168.2.2
#       netmask 255.255.255.0
#       network 192.168.2.0
#       broadcast 192.168.2.255
#       post-up route add -net 192.168.0.0 netmask 255.255.0.0 gw 192.168.2.2 dev eth2
#       pre-down route del -net 192.168.0.0 netmask 255.255.0.0 gw 192.168.2.2 dev eth2

#auto eth3
#iface eth3 inet static
#       address 192.168.3.3
#       netmask 255.255.255.0
#       network 192.168.3.0
#       broadcast 192.168.3.255
#       post-up route add -net 192.168.0.0 netmask 255.255.0.0 gw 192.168.3.3 dev eth3
#       pre-down route del -net 192.168.0.0 netmask 255.255.0.0 gw 192.168.3.3 dev eth3
What does this do? When the computer (or more precisely the network interface eth1) starts, it is given the IP address 192.168.1.11 with subnet mask 255.255.255.0. The post-up line also adds a route to the routing table when the interface starts (the last line removes this route when the interface goes down). This route will act as the default route inside the virtual network (i.e. to all networks within 192.168.0.0/16).
The set of lines for eth2 and eth3 are all currently commented out - they do nothing. They follow the same format as for eth1. I've included them for convenience when you create a virtual machine with two or three internal interfaces, e.g. router. You can just uncomment the lines and edit the addresses as needed.
Note that the all lines are not necessarily needed for all interfaces. For example, the post-up and pre-down lines may not be needed when configuring a router. Also the values I use may not be appropriate for your network. The lines I provide are just defaults - they should be changed appropriately depending on the virtual machine/network you are trying to configure. For a description of the interfaces file type man interfaces on the command line.
Configure Apache and MySQL Servers
Apache web server and MySQL database servers were installed when selecting the LAMP server package. By default both servers start upon boot. However in many cases they will not be needed, so we will configure the virtual machine so that both servers are off upon boot. Then you will need to manually start them if you need them.
To configure MySQL to be off upon boot:
network@base:~$ sudo sh -c 'echo "manual" > /etc/init/mysql.override'
To configure Apache to be off upon boot:
network@base:~$ sudo update-rc.d apache2 disable
Configure Other Software
There are several scripts and template files that I have developed to automate some tasks in the virtual network. To copy these files to each virtual machine and keep them up to date we will use Subversion (SVN). To download the current files:
network@base:~$ svn checkout https://sandilands.info/svn/virtnet/
This downloads the latest version of the files and places them in the virtnet directory. From now on, to get the most recent versions (or any new files), just update this directory:
network@base:~$ svn update ~/virtnet
One file that is provided is a set of aliases and environment variables for the Bash shell used in the terminal. To use these aliases and environment variables:
network@base:~$ ln -s ~/virtnet/data/defaults/home/network/DOTbash_aliases ~/.bash_aliases
This links the file ~/.bash_aliases to the actual file ~/virtnet/data/defaults/home/network/DOTbash_aliases. The aliases and environment variables will be available when you next login.
Password-less Logins
Once you have multiple virtual machines running in a network, you will often want to use SSH to connect to other machines. As a convenience, you can set each machine up so that you can SSH (login) without supplying a password (instead RSA public key cryptography is used). To set this up first generate a RSA key pair:
network@base:~$ ssh-keygen
Generating public/private rsa key pair.
Enter file in which to save the key (/home/network/.ssh/id_rsa): ENTER
Enter passphrase (empty for no passphrase): ENTER
Enter same passphrase again: ENTER
Your identification has been saved in /home/network/.ssh/id_rsa.
Your public key has been saved in /home/network/.ssh/id_rsa.pub.
The key fingerprint is:
4d:5f:66:33:21:bf:85:a4:8b:70:b2:ea:5b:da:ed:32 network@node1
The key's randomart image is:
+--[ RSA 2048]----+
|            . o  |
|             = o |
|        o o . O .|
|         B o = = |
|        S o o .  |
|       .         |
|      . .        |
|     . +E.       |
|      +..+o      |
+-----------------+
Note that the default file location is ok (just press ENTER), and no passphrase is needed (press ENTER twice).
Now copy your public key (id_rsa.pub) into your authorized_keys file:
network@base:~$ cat ~/.ssh/id_rsa.pub >> ~/.ssh/authorized_keys
This allows you to login with SSH from the computer that has the corresponding private key (id_rsa) to the computer that has the public key in authorized_keys, without entering a password. That is, you login from this computer to this same computer without needed to enter your password. That doesn't seem much use (and its not yet). But once we clone this virtual machine to make other virtual machines it will allow you to login to those cloned virtual machines without entering a password. We'll see the cloning later.
Optionally, you may also copy your id_rsa.pub from the host (if you have one - otherwise generate a key pair as above) into the virtual machine authorized_keys files so you can login from host to virtual machine without entering a password.
Restart the Virtual Machine
Reboot the VM using the reboot command:
network@base:~$ sudo reboot
Prepare Interfaces for Cloning
The next step will be to clone this base virtual machine to create multiple other virtual machines. When we clone, VirtualBox can change the hardware (MAC) address of the network interfaces (so the new machine has a different hardware address to the original machine - this is desirable). However, Ubuntu is currently configured to give interface names (such as eth0 and eth1) based on hardware addresses. If we changed the hardware address, then Ubuntu will not be able to configure the interface upon booting, which is a problem. To avoid this we need to disable the current mapping from hardware address to interface name.
Edit the file /etc/udev/rules.d/70-persistent-net.rules and comment out the two lines that start with SUBSYSTEM by inserting the # character. (Alternatively, you can delete the lines).
network@base:~$ sudo nano /etc/udev/rules.d/70-persistent-net.rules
After adding the # character, it should like like the following (although the values, especially addresses may differ). Importantly, all lines are commented out.
# This file was automatically generated by the /lib/udev/write_net_rules
# program, run by the persistent-net-generator.rules rules file.
#
# You can modify it, as long as you keep each rule on a single
# line, and change only the value of the NAME= key.

# PCI device 0x8086:/sys/devices/pci0000:00/0000:00:03.0 (e1000)
# SUBSYSTEM=="net", ACTION=="add", DRIVERS=="?*", ATTR{address}=="08:00:27:42:69:56", ATTR{dev_id}=="0x0", ATTR{type}=="1", KERNEL=="eth*", NAME="eth0"

# PCI device 0x1af4:/sys/devices/pci0000:00/0000:00:08.0/virtio1 (virtio-pci)
# SUBSYSTEM=="net", ACTION=="add", DRIVERS=="?*", ATTR{address}=="08:00:27:0f:f3:79", ATTR{dev_id}=="0x0", ATTR{type}=="1", KERNEL=="eth*", NAME="eth1"
Now shutdown the VM using the poweroff command:
network@base:~$ sudo poweroff
It's important that you comment out the lines in /etc/udev/rules.d/70-persistent-net.rules just before you poweroff and start the cloning with VirtualBox. If you start the virtual machine again before cloning, then Ubuntu will automatically add the lines to /etc/udev/rules.d/70-persistent-net.rules and you will have to remove them again. So now that the virtual machine is off, move to the next step of cloning it.
Clone the Base Virtual Machine
Our virtual network will consist of a set of virtual machines, or nodes. Each node will be created by cloning the base virtual machine. The previous step configured the base virtual machine so that once it is cloned and a node is created, it will be quicky and easy to configure that node correctly. This step describes how to clone in VirtualBox. You need to repeat this step as many times as the number of nodes you need in your virtual network. For example, if your network has three nodes, make three clones of the base virtual machine. The next step shows how to configure the node after it is cloned.
VirtualBox provides both a GUI and a command line interface (CLI) to manipulate virtual machines. If you are creating your first virtual network or just small networks, the GUI is a good choice. However once you understand the cloning process and you want to create large virtual networks, the CLI is very useful in automating the process. I provide instructions for both approaches below - choose whichever is appropriate for your situation.
Cloning with VirtualBox GUI
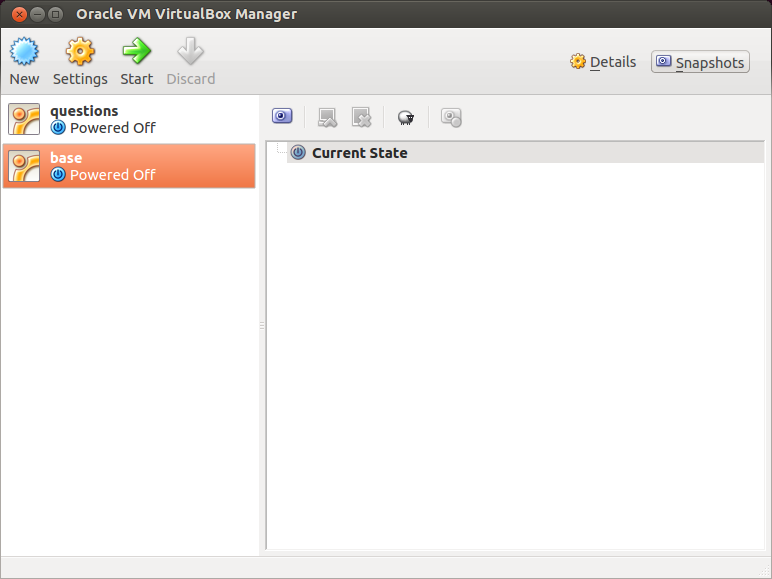
First create a snapshot of the base virtual machine. This snapshot, which is a version of the base virtual machine at specific time instance, will be cloned.
Select the base VM and then click the Snapshots button:
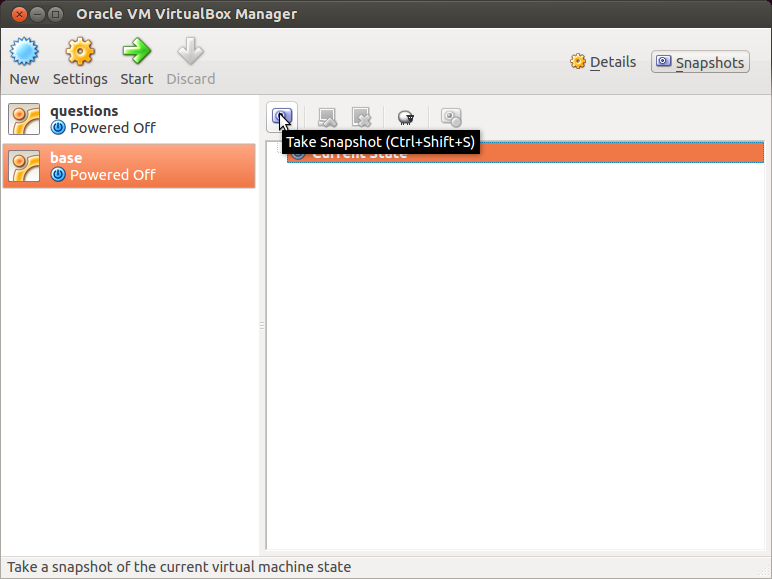
Click the Take Snapshot button:
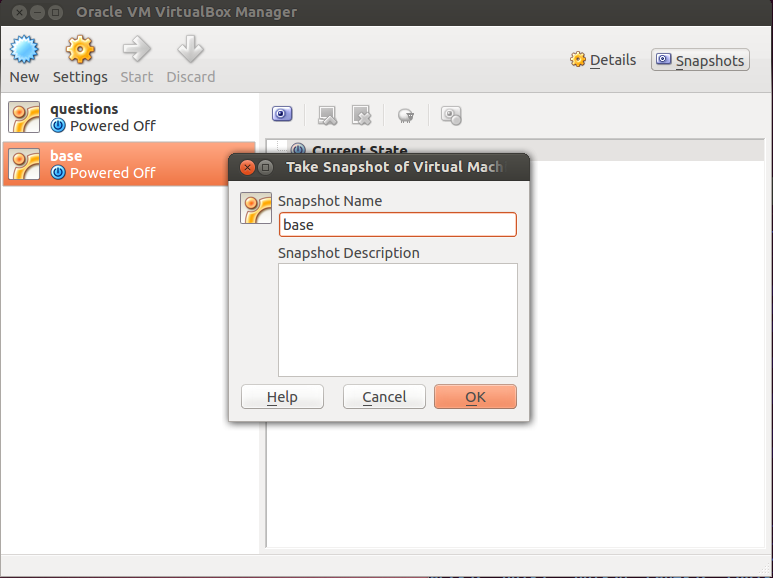
Name the snapshot base (i.e. same name as the VM):
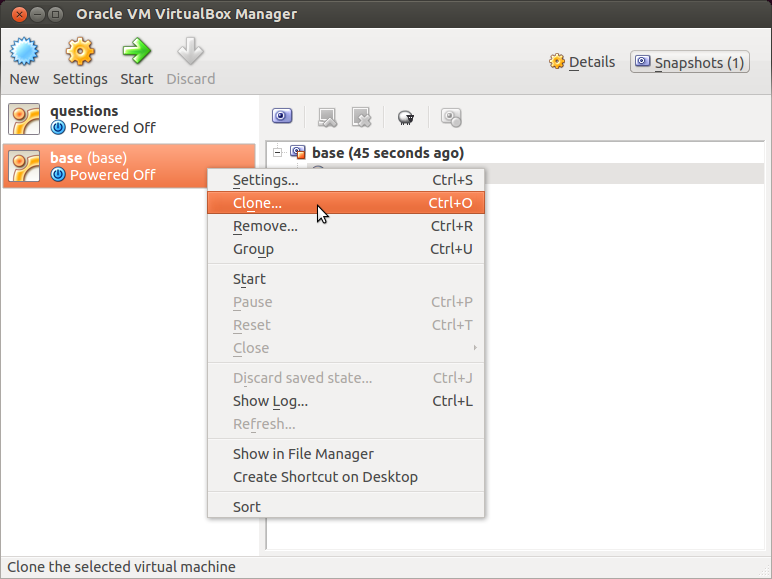
Now that the snapshot is created, right click on the base VM and select Clone...:
Name the clone node1 (and subsequent clones, node2, node3 etc.) and check Reinitialize the MAC address of all network cards:
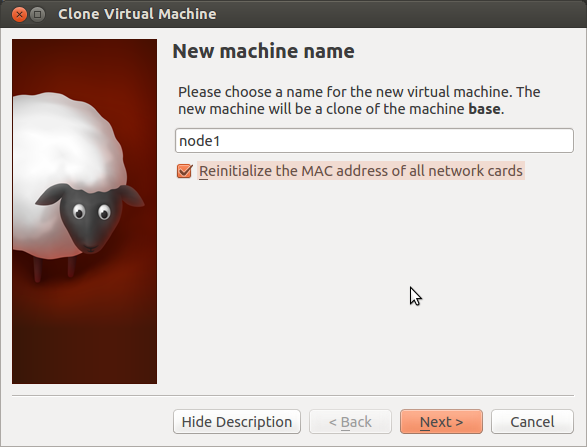
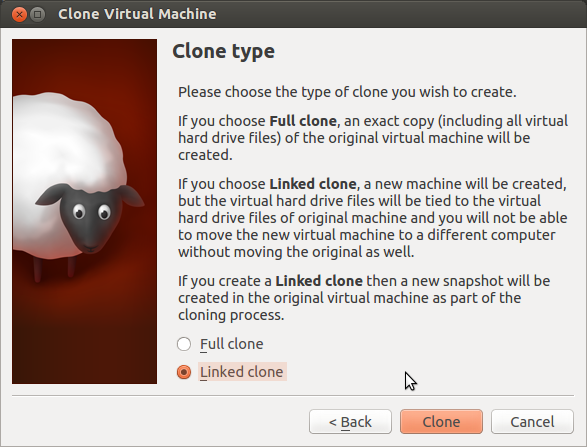
Select Linked clone as the clone type. With a linked clone, only the changes between the cloned VM and the base VM hard disks are saved. With a full clone, the entire base VM hard disk is copied. Using a linked clone saves significant hard disk space on the host (at the expense of performance if the clone is used for a long time and many disk changes are made compared to the base).
Now the new virtual machine has been created, you may need to configure the network adapter settings. This depends on what role this node has in the virtual network. Recall that in our base virtual machine we configured four network adapters:
- Adapter 1: NAT, used for connection to host and internet.
- Adapter 2: internal, used for connecting to other nodes. Initially configured to use internal network neta.
- Adapter 3: internal, used for connecting to other nodes. Initially configured to use internal network netb but with the cable disconnected.
- Adapter 4: internal, used for connecting to other nodes. Initially configured to use internal network netc but with the cable disconnected.
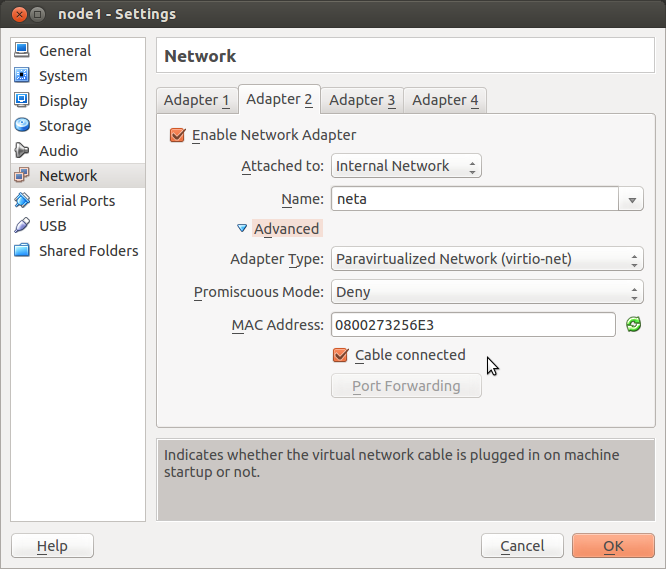
You may need to change the settings for adpaters 2, 3 or 4, depending on how you intend this node to connect to other nodes in the virtual network. For example, if this node is node1 in the network below, then no changes to the adapters are needed. However if this node is node2, then you need to connect the cable (by checking Cable connected for Adapter 3).

In summary, for the new virtual machine, configure the settings for adapters 2, 3 and 4 by setting the appropriate internal network name (e.g. neta, netb, netc) and connecting/disconnecting the cable depending on whether the adapter is needed or not.
The final change is to set the port to be used for port forwarding on adapter 1 (that NAT interface). For the base virtual machine the port 2201 was set to forward to the SSH port 22. You should change the port so that it is unique for each node. For example, on node1 use port 2201, on node2 use port 2202, on node3 use port 2203 and so on. (You can use other ports; they don't have to be 2201, 2202, etc.). If I was configuring node5 then I would set the port to 2205.
Now you can start the new virtual machine and proceed to the next step to configure it.
Cloning with VirtualBox Command Line Interface
Anything you can do in the VirtualBox GUI can also be performed using the VirtualBox command line interface using the program VBoxManage. This is very useful if you want to automate steps, especially when creating large networks: put the VBoxManage commands in a script and then just run the script. The VirtualBox manual gives the details of using VBoxManage. Here I just present the commands that can be used to achieve the cloning performed with the GUI above.
To start, I assume that the base virtual machine exists and has a snapshot also called base. See the GUI steps to create a snapshot (in fact you can also do it on the command line).
List the current virtual machines:
$ VBoxManage list vms
"questions" {5d8bf8b2-40e9-47fa-b35c-dd1e54aa627c}
"base" {6fc0828a-1d62-4b9a-ba7f-6e334bc66b3d}
List the current running virtual machines:
$ VBoxManage list runningvms
"questions" {5d8bf8b2-40e9-47fa-b35c-dd1e54aa627c}
Now that we know the base virtual machine exists and is not currently running, we can clone it. Clone the base virtual machine, creating a new virtual machine called node1, using a linked clone and register with the VirtualBox manager:
$ VBoxManage clonevm base --snapshot base --name node1 --options link --register
0%...10%...20%...30%...40%...50%...60%...70%...80%...90%...100%
Machine has been successfully cloned as "node1"
To check, list the VMs again:
$ VBoxManage list vms
"questions" {5d8bf8b2-40e9-47fa-b35c-dd1e54aa627c}
"base" {6fc0828a-1d62-4b9a-ba7f-6e334bc66b3d}
"node1" {cb4bd138-5cbe-4995-9250-a9f930bc8625}
Now change the adapter settings. To do this, you need to know the adapter that you want to change (e.g. adapter 2, 3 or 4). You can connect/disconnect the cable and name the internal network. For example, to set the network name on adapater 2 to be netc:
$ VBoxManage modifyvm node1 --nic2 intnet --intnet2 netc
Or to set the cable on adapter 3 to be disconnected:
$ VBoxManage modifyvm node1 --cableconnected3 off
To view information about a virtual machine (below I only show the output related to the network adapters):
$ VBoxManage showvminfo node1
...
NIC 1:           MAC: 080027929632, Attachment: NAT, Cable connected: on, Trace: off (file: none), Type: virtio, Reported speed: 0 Mbps, Boot priority: 0, Promisc Policy: deny, Bandwidth group: none
NIC 1 Settings:  MTU: 0, Socket (send: 64, receive: 64), TCP Window (send:64, receive: 64)
NIC 1 Rule(0):   name = ssh, protocol = tcp, host ip = , host port = 2201, guest ip = , guest port = 22
NIC 2:           MAC: 080027FD87BE, Attachment: Internal Network 'netc', Cable connected: on, Trace: off (file: none), Type: virtio, Reported speed: 0 Mbps, Boot priority: 0, Promisc Policy: deny, Bandwidth group: none
NIC 3:           MAC: 080027876368, Attachment: Internal Network 'netb', Cable connected: off, Trace: off (file: none), Type: virtio, Reported speed: 0 Mbps, Boot priority: 0, Promisc Policy: deny, Bandwidth group: none
NIC 4:           MAC: 08002785F443, Attachment: Internal Network 'netc', Cable connected: off, Trace: off (file: none), Type: virtio, Reported speed: 0 Mbps, Boot priority: 0, Promisc Policy: deny, Bandwidth group: none
...
To set the port number for port forwarding you should delete the existing rule (if necessary) and add a new rule. For example, if I want to use port 2205 for a virtual machine and the old rule called ssh used a different port:
$ VBoxManage modifyvm node1 --natpf1 delete ssh
$ VBoxManage modifyvm node1 --natpf1 ssh,tcp,,2205,,22
To start a virtual machine without a GUI interface, i.e. in headless mode:
$ VBoxManage startvm --type headless node1
Configure Each Node
When you have created a node by cloning the base virtual machine, start and login to that node. There are several steps needed to finalize the node configuration. Also, depending on the role of the node in the virtual network, you may need to make further configuration changes.
All Nodes
First change the host name in both the /etc/hostname and /etc/hosts files. You can edit them manually with the text editor nano (also using sudo) or change them directly with the following lines (replacing node1 with your node name):
network@base:~$ sudo sed -i 's/base/node1/' /etc/hostname
network@base:~$ sudo sed -i 's/base/node1/' /etc/hosts
Next set the appropriate addresses for your node interfaces. Open /etc/network/interfaces with nano and change the values to suit your node. Once you have saved the file, restart the interface(s) that you changed by either rebooting or:
network@base:~$ sudo ifdown eth1
network@base:~$ sudo ifup eth1
Router Nodes
If your node is a router in the virtual network then you need to set forwarding to be on. You need to set the ip_forward parameter in the kernel to be 1. There are several ways, one being:
network@base:~# sudo sysctl net.ipv4.ip_forward=1
Your node is now a router. However this setting will not be in effect after a reboot. To set it permanently you can edit the file /etc/sysctl.conf and set net.ipv4.ip_forward to 1. Alternatively run:
network@base: ~# sudo sed -i 's/#net.ipv4.ip_forward=1/net.ipv4.ip_forward=1/' /etc/sysctl.conf
Web Server Nodes
Although Apache web server is installed in all nodes, we configured the base to disable it upon boot. If you want a node to run a web server (as well as MySQL database) then you can perform the following:
network@base:~$ sudo service mysql start
mysql start/running, process 1036
network@base:~$ sudo apache2ctl start
If you see a warning from Apache about not being able to reliably determine the server's domain name, then don't worry. Later you can edit the ServerName variable in the Apache configuration to avoid this warning.
Note that Apache and MySQL will be off again when you reboot. To automatically start the server upon booting, effectively reverse the steps in disabling the servers on boot.
To configure MySQL to be on upon boot delete the override file:
network@base:~$ sudo rm /etc/init/mysql.override
To configure Apache to be on upon boot:
network@base:~$ sudo update-rc.d apache2 enable
Reboot and Test
Now reboot your node, login and test. Then repeat the steps of cloning and configuring for other nodes to create your virtual network.
Using Your Virtual Network
Once you have created several nodes and configured their network interfaces you can start using your virtual network. To finish I point to some further resources that may assist when using your network.
You can use the VirtualBox graphical interface to run and access the virtual guests. However often you may want to access the guests using applications on your host computer, e.g. web browser, file explorer, SSH client. I have described several ways to do this, that will work for a Linux, OSX and Windows host operating systems.
Created on Wed, 11 Sep 2013, 8:41pm
Last changed on Thu, 25 Sep 2014, 11:31am